Joe Lanman - Designer
GOV.UK Prototype Kit - Data driven prototyping
One of the big advantages of using the GOV.UK Prototype Kit is the ability to use data.
For example take an admin system with a list of items and a page to view and edit each item. In other prototyping apps you might have to create a page for each item, and update both the list and the page separately if you want to change something.
Using the kit you can define the list as data, and design just the list page and the item page. You can now change the list, add or remove items and all the pages update automatically.
The kit tutorial is about getting a juggling licence (I recommend following that before this one). So for this tutorial, let’s design the admin side - where we can process the applications for a juggling licence.
About JSON
We’ll be using a format called JSON (JavaScript Object Notation) for our data.
Some JSON basics:
Array (a list)
[
  "Apples",
  "Blueberries",
  "Pears",
  "Strawberries"
]
Arrays begin and end with square brackets [ ]
Object, with name/value pairs
{
  "name": "Giulia",
  "age": 63
}
- objects begin and end with curly brackets { }
- the name of each value is in quotes, followed by a colon
- strings (text values) are in quotes
- each name/value pair ends in a comma, except the last one
You can put arrays in objects, or objects in arrays:
[
  {
    "name": "Giulia",
    "age": 63
  },
  {
    "name": "Rhian",
    "age": 22
  }
]
1. Adding data
Open the session data defaults file:
app/data/session-data-defaults.js
Add our data:
module.exports = {

  // Insert values here

  "applications": [
    {
      "id" : 1,
      "name": "Giulia",
      "date": "1/2/2026",
      "how-many-balls": "1 or 2",
      "most-impressive-trick": "Juggling on a unicycle"
    },
    {
      "id" : 2,
      "name": "Rhian",
      "date": "2/2/2026",
      "how-many-balls": "3 or more",
      "most-impressive-trick": "Juggling chainsaws"
    },
    {
      "id" : 3,
      "name": "Maeve",
      "date": "4/2/2026",
      "how-many-balls": "1 or 2",
      "most-impressive-trick": "Upside down"
    }
  ]

}
Important note on changing the default data
Session data is created from this file and stored when you open the prototype in the browser. If you change the default data, you need to click the ‘Clear data’ link in the footer to reset it to the new defaults.
2. Applications list page
In the app/views folder create a new file called applications.html
Add this code:
{% extends "layouts/main.html" %}

{% set pageName="Applications" %}

{% block content %}

  <h1 class="govuk-heading-l">
    Juggling licence applications
  </h1>

  <table class="govuk-table">

    <thead>
      <tr>
        <th scope="col" class="govuk-table__header">
          Name
        </th>
        <th scope="col" class="govuk-table__header">
          Date sent
        </th>
      </tr>
    </thead>

    <tbody>

      {% for application in data['applications'] %}

        <tr>

          <th scope="row" class="govuk-table__header">
              <a href="/applications/{{ application['id'] }}">
                {{ application['name'] }}
              </a>
          </th>

          <td class="govuk-table__cell">
            {{ application['date'] }}
          </td>

        </tr>

      {% endfor %}

    </tbody>

  </table>

{% endblock %}
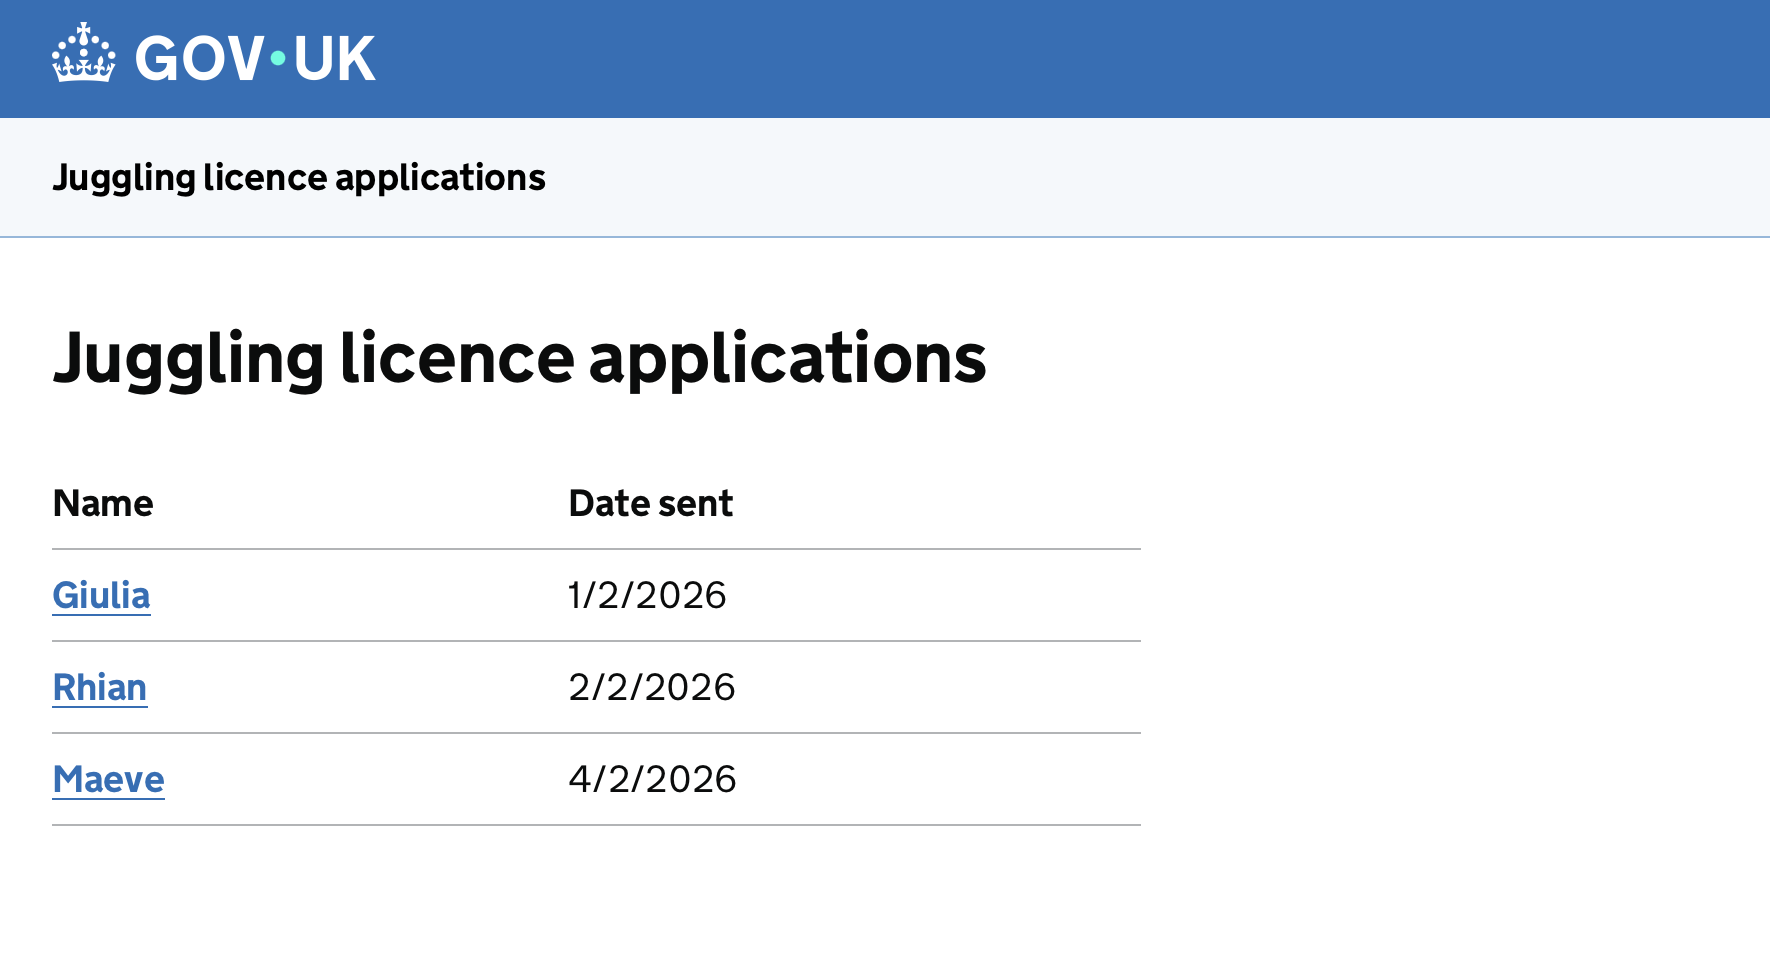
Open the applications page in the browser:
http://localhost:3000/applications
It should look like this:
3. Application view page
In the app/views folder create a new file called application-view.html.
Add this code:
{% extends "layouts/main.html" %}

{% set pageName="Application" %}

{% block beforeContent %}
  {{ govukBackLink({
    text: "Back",
    href: "/applications"
  }) }}
{% endblock %}

{% block content %}

<div class="govuk-grid-row">
  <div class="govuk-grid-column-two-thirds">

    <h1 class="govuk-heading-l">
      {{ application['name'] }}
    </h1>

    <dl class="govuk-summary-list">

      <div class="govuk-summary-list__row">
        <dt class="govuk-summary-list__key">
          How many balls can you juggle?
        </dt>
        <dd class="govuk-summary-list__value">
          {{ application['how-many-balls'] }}
        </dd>
      </div>

      <div class="govuk-summary-list__row">
        <dt class="govuk-summary-list__key">
          Most impressive juggling trick?
        </dt>
        <dd class="govuk-summary-list__value">
          {{ application['most-impressive-trick'] }}
        </dd>
      </div>

    </dl>

  </div>
</div>

{% endblock %}
If you view the page in the browser, the details will be blank. We need to write a route to get the data.
4. Add a route
In app/routes.js add this code:
// Add your routes here

router.get('/applications/:id', function(request, response) {

  var id = request.params.id
  var data = request.session.data

  var application = data.applications.find(function(application){
    return application.id == id
  })

  response.locals.application = application
  response.render('application-view')

})
Let’s go through that code.
router.get('/applications/:id', function(request, response) {

  var id = request.params.id
We get the id for the application from the path. :id means ‘store whatever comes here as a parameter’.
var data = request.session.data
We store the session data in data so it’s easier to refer to later.
var application = data.applications.find(function(application){
  return application.id == id
})
We get the applications from the session data, and use the find function to get the one where the id matches the one in the path.
response.locals.application = application
We are making the application available to the page, so now lines like this on the page work:
{{ application['name'] }}
You can find out more about routes in the kit documentation
If you go to the applications list page in the browser and click the links, you should now get a page with details for each application, like this:

Change the data
Make a change to the session-data-defaults.js file - for example change a name or add another application, and save the file.
Click the ‘Clear data’ link in the footer to reset it to the new defaults.
Your changes will now appear on both the list of applications, and the relevant application page.